Wednesday, 23 November 2011

Thanks Owl (cricut) Card


Materials used..
Cricut
Cindy Loo Cricut Cartridge
Brown card
Pale blue card
Cream card
Green card


 Step by Step instructions

1.     Press the Fit to Length button. Set the dial size to 71/2”. Place the patterned paper on to your mat. Press the Font feature button. Press doily 1 and cut.
2.     Repeat this process with the pale blue card.
3.     Place brown card on to your mat. Remove Fit to length. Set your size to 21/2”. Press the owl button and cut.
4.     Put green card onto your mat. Press shift and the owl button and cut.
5.     Put the pale blue card onto your mat. Press the layer feature button, the owl and cut.
6.     Put cream card on your mat. Make sure the Layer button is still pressed. Press shift, owl and cut.
7.     Put brown card on your mat. Set the dial size to 21/2”. Press the border feature button. Press tree and cut. Change the dial size to 11/2” and repeat.
8.     Put green card on to the mat. Leave the size at 11/2”. Press border, shift and press tree three times tree and cut. Change the dial size to 21/2” and repeat.
9.     Put pale blue card on to the mat. Set the dial size to 11/2”. Press the bird and cut. Repeat this with the size dial at 1”.
10.            Put the patterned paper on the mat. Change the dial size to 11/2”. Press shift and bird and cut. Repeat with dial size at 1”.
11.            Put brown card on mat. Size at 1/12” press layer feature button,bird and cut. Repeat at 1”
12.            Put cream card on mat. Size at 1” Press layer button, shift, bird and cut. Repeat with dial size at 11/2”.
13.            Ink all the pieces and stick all the layers together for the different sections.
14.            Build up the card.

Happy Crafting,
Love Melanie xxx

Friend (cricut) Card


 Step by step instructions

1.     Place red card on your mat. Set the size at 31/2”. Press the Flower 4 button. Press cut.

2.     Leaving the red card on the mat, apply the layer feature button, press shift and flower 4 and cut.
3.     Place pink card on your mat. Press shift and flower 4 and cut.
4.     Put white card on your mat. Apply the layer feature button. Press flower 4 and cut. Set all your pieces to one side.
5.     Put the darker shade of green card on the mat. Set Fit to length application. Set the dial size at 41/2”. Press the Vine 1 button and cut.
6.     Put the paler green card on your mat press the shift button and Vine 1 and cut. Place these to one side. Remove fit to length.
7.     With the dial size set at 41/2”,put the darker green card on your mat. Apply the border feature button. Press shift and tree1 and cut. Repeat this wth th lighter green card.
8.     Place the lighter pink card on a mat and set the size dial to 61/2”Press the shadow feature button. Press the Doily 1 button and cut.
9.     Place the red card on to your mat and set the dial size at 11/2”. Press the Font feature and shift and F and cut.
10.            Remove the shift button if necessary. Press riend and cut. Press the layer feature, shift and Filigre 1. Cut.
11.            Create a 6” x 12” card and score in half, Build up all your individual pieces and make card .


Happy Crafting,
Love Melanie xxx

Thank you (cricut) card

Materials used..

Cricut Machine
Cricut Cartridge Wall Decor
White card
Bright pink card
Brown card
Violet card
Green card
Light pink card
Lilac card
Pale lilac card
                                                                                    Yellow card


Step by step instructions

Put the green card on your mat. Set the size at 4”. Load mat. Press Border, Plant (page 45) and cut. Unload mat.

Put the brown card on your mat. Load mat. Press Border, Plant and cut. Unload mat. Cut the stems and leaf sections away so you are just let with the plant pots. Repeat this again and trim to create the tops of the plant pots.

Put the green card on the mat. Load the mat. Set the size to 1 ½”. Press the shift lock button. Press flower (page 60) six times and cut.  Making sure your shift lock button is still lit set the size to 2” and then press flower twice and cut. Set the size to 4 ¼”. Remove the shift lock feature. Press Plant (page 45) and cut. Unload mat. Cut away the pot just leaving the stem and leaf. (You will use this to add to the far right plant pot when everything is put together) Trust me I know what I am doing!!!!!!! Lol x

Put the bright pink card on the mat. Load mat. Set the size to 2”. Press shift lock and flower (page 60) twice and cut. Trim away the leaf section following the shape of the flower.

Put pale pink card on the mat. Load mat. Set the size to 1 ½” Make sure shift lock is still on press flower twice and cut. Repeat this with pale lilac and dark lilac card. Trim the leaves from the flowers following the shape of the flower.

Put yellow card on the mat. Set the size at 2”. Press flower twice and cut. Then change the size to 1 ½”. Press flower six times and cut. Remove mat and keep the centres of the flowers.

Put the dark lilac card on the mat. Set the size at 2”. Load mat. Press shift lock,font shadow and type THANK. Press cut. Unload mat

Put the light pink card on the mat. Remove the shadow feature.Make sure shift lock is still on. Press THANK and cut.

Glue the plant pots to the pot and leaf section. Build up the pots.

Layer the flowers on to the green base. You may want to trim off a leaf or two and add them in elsewhere.

Layer the letters together.

Build up the card as follows

Cut the following ; White card for front layer 7 7/8” x 7 3/8”.
Bright pink card  8 1/8” x 7 ¾”.
White card  8 ½” x 8 1/8”.
Brown card  8 7/8” x 8 ½”.
Violet card  9 1/8” x 8 5/8”   and   10 1/8” x 8 5/8”.

Score the larger of the violet pieces at 1” in from the length. Fold back on the score line and glue this to the back of the other violet piece to create the card.

Happy Crafting,
Love Melanie xxx

Freshly Picked Card Project

FRESHLY PICKED CARD PROJECT
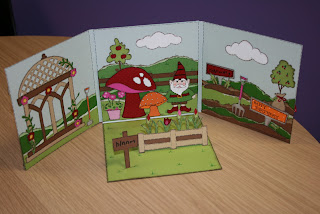

Materials used..  
Cricut Machine
Freshly Picked Cartridge
Light brown card
Dark Brown card
Light green card
Medium green card
Dark green card
Light pink card
Bright pink card
Red card
Yellow card
White card
Bright orange card
Muted Orange card
Pale blue card
Silver card
Flesh card


Step by step instructions

FRONT COVER

1         Set your Cricut to speed 5, pressure 5, and blade 6.

2         Put the light brown card on to your mat. Load in to machine. Set the size to 5 ½”. Press GATE (page 46 ) and cut. Unload mat.

3         Put the dark brown card on mat. Press SHIFT and GATE and CUT. Unload.

4         Put silver card on mat. Press LAYERS and GATE and CUT. Unload.

5         Put dark green card on mat. Press SHIFT, LAYERS and GATE and CUT.

6         Put red card on the mat. Press LAYERS 2, GATE and cut. Unload mat.

7         Put bright pink card on the mat. Set the size to 1 ¼”. Load mat. Press HAT 1(page 53) and CUT. Unload mat. Put red card on the mat. Press LAYERS2,Hat 1 and Cut.

8         Put light pink card on your mat. Press SHIFT, HAT 1 and CUT. Unload mat.

9         Put yellow card on the mat. Press LAYERS, HAT1 and CUT.  Unload mat.

10     Put dark green card on the mat. Press SHIFT, LAYERS and HAT 1 and CUT.

INSIDE FRONT COVER.

1         Put light brown card on the mat. Set the size dial to 5 ½”. Press GAZEBO ( page 47 ) and CUT.
Unload mat.
2         Put dark brown on mat. Press SHIFT and GAZEBO and CUT. Unload mat.

3         Put dark green card on the mat. Press LAYERS, GAZEBO and CUT. Unload mat.


4         Put medium green card on the mat. Press SHIFT, LAYERS, GAZEBO and CUT. Unload mat.

5         Put red card on the mat. Press LAYERS 2, GAZEBO and CUT. Unload mat.

6         Put silver card on the mat. Set the size to 2 ½”. Press HOE ( page 65 )  and CUT. Unload.

7         Put bright orange card on the mat. Press SHIFT, HOE and CUT. Unload.

MIDDLE TOP LAYER.

1       Put flesh card on the mat. Set the size to 3 ½”. Press GNOME 3 ( Page 37 )  and CUT. Unload.

2     Put dark brown card on mat. Press SHIFT and GNOME3 and CUT.

3     Put medium green card on the mat. Press LAYERS, GNOME 3 and CUT. Unload.

4     Put Red Card on the mat. Press SHIFT, LAYERS and GNOME 3 and CUT. Unload.

5     Put white card on the mat. Press LAYERS 2 and GNOME 3 and CUT.

6   Put Yellow card on the mat. Press GNOME 3, and CUT.  Unload.

7     Put pale pink card on the mat. Press SHIFT, GNOME 3 and CUT. Unload.

8     Put red card on the mat. Set the size dial to 3 ½”. Press MUSHROOM  ( page 34 ) and CUT. Unload.

9     Put muted orange card on the mat. Press SHIFT, Mushroom and CUT. Unload.

10   Put bright pink card on the mat. Press LAYERS, MUSHROOM and CUT. Unload.

11     Put bright orange card on the mat. Press SHIFT, LAYERS, MUSHROOM and CUT.

12     Put white card on the mat. Press LAYERS 2, MUSHROOM and CUT.

13     Put light pink card on the mat. Set the size dial to 2”. Press FLOWER 2  ( page 31 ) and CUT.

14     Put bright pink card on the mat, Press SHIFT, FLOWER 2 and CUT. Unload.

15     Put Medium green card on the mat. Press LAYERS, FLOWER 2 and CUT.

16     Put light green card on the mat. Press SHIFT, LAYERS, FLOWER 2 and CUT.

17     Put dark brown card on the mat. Set the size to 2”. Press LAYERS 2 and FLOWER 6 ( page 50 ) TWICE and CUT.

18     Put dark brown card on the mat. Set the dial size to 3”. Press APPLE ( page 28 )  and CUT.

19     Put light green card on the mat. Press LAYERS, APPLE and CUT.

20     Put Red card on the mat. Press LAYERS 2, APPLE and CUT.
  
  MIDDLE BOTTOM SECTION.
 
1     Put mid green card on the mat. Set the size to 2 ¼”. Press FLOWER 6 ( page 50 ) and CUT.

2     Put the light green card on the mat. Press SHIFT, FLOWER 6 and CUT. Unload.

3     Put red card on the mat. Press LAYERS,FLOWER 6 and CUT.

4     Put Dark brown card on the mat. Press SHIFT, LAYERS, FLOWER 6 and CUT.

5     Put the light brown card on the mat. Press LAYERS 2, FLOWER 6  and CUT.

6     Put dark brown card on the mat. Set the size to 2 ¼”. Press SHIFT, SIGNS, BOOTS( page 57 ) and CUT.

   RIGHT HAND SIDE SECTION.

1     Put silver card on the mat. Set the size to 1 ¾”. Press ROSMRY 2 ( page 42 ), ROSMRY and CUT.

2     Put the red card on the mat. Press LAYERS, ROSMRY 2 , and CUT.

3     Put light green card on the mat. Press SHIFT, LAYERS, ROSMRY 2 and CUT.

4     Put the dark brown card on the mat. Press LAYERS 2, ROSMRY 2 and CUT.

5     Put Silver card on the mat. Set the size to 2”. Press SAGE ( page 44 ) and CUT.

6     Put the bright orange card on the mat. Press SHIFT, SAGE and CUT.

7     Put the light green card on the mat. Press SHIFT, LAYERS and SAGE and CUT.

8  Put the dark brown card on the mat. Press LAYERS 2, SAGE and CUT.

9     Put the silver card o the mat. Set the size to 3”. Press PCHFRK  ( page 61 )and CUT.

10     Put bright pink card on the mat. Press LAYERS, PCHFRK and CUT.

11     Put the dark brown card on the mat. Set the size to 3”. Press CHERRY ( page 29 ) and CUT.

12     Put the light brown card on the mat. Press SHIFT, Cherry and CUT.

13     Put the light green card on the mat. Press LAYERS, CHERRY and CUT.

14     Put the red card on the mat. Press LAYERS 2, CHERRY and CUT.

RIGHT HAND SIDE BACK.

1     Put the pale pink card on the mat. Set the size to 5”. Press FRAMES, CHERRY and CUT.

2     Cut by hand a piece of bright pink card to the same size as the frame.

3     Put light green card on the mat. Set the size dial at 3”. Press OVERALL  ( page 52 )and CUT.

4     Put the medium green card on the mat. Press SHIFT, OVERALL and CUT.

5    Put the bright pink card on the mat. Press LAYERS, OVERALL and CUT.

6     Put the pale pink card on the mat. Press SHIFT, LAYERS and OVERALL and CUT.

7     Put the dark green card on the mat. Set the size at 2 ½”. Press BOOTS ( page 57 ) and CUT.

8     Put light green card on the mat. Press SHIFT, BOOTS and CUT.

9     Put the bright pink card on the mat. Press LAYERS, BOOTS and CUT.

10     Put the yellow card on the mat. Press SHIFT, LAYERS, BOOTS and CUT.

Putting the card together
Cut two sheet of light blue card into 6” by 12” pieces. Score three of them at 5 ¾” and 6” horizontally. Place two of the strips on the table in front of you so they lie horizontally. Glue the right section to the left section lining the edge of the right one to the 6” scoreline of the left piece. Take the third strip and place it vertically. Glue the 6 “ top section to the centre of the other sections . 
Tear strips of various green and brown card and build up the grass hill sections.
Ink the edges of EVERYTHING!!!! Them build up each design. If you want to, use a fine liner blackpen and dash around the edges of each piece to highlight.
Cut a piece of light green card 5 ¾” long by 6” deep. Cut strips of acetate and stick them to the back of the sign post and the Flower 6 section. Align them to where you want them to go and cut small slits into the light green piece of card. Thread the acetate through the card and attach it to the bottom of the vertical centre section.

Happy Crafting
Love Melanie xxx

Friday, 18 November 2011

Latest Stampavie Samples


 Materials used..

Garden Girl Papers
Loopy Lops Plant Pot 
Flower Planters
Violet Cardstock
  Materials used..

  Garden Girl Papers
  Little Lamb Stamp
  Violet Cardstock


 Materials used..

Garden Girl Papers
Celebration Table Stamp
Loopy Lops Gift Box Stamp
Violet Cardstock


 Materials used..

Garden Girl Papers
Garden Girl Jewels
Garden Girl Sticker
Penelope Stamp
Violet Cardstock
 Materials used..

Sweet Tooth Papers
Kittys Bow Stamp 
Passion Fruit Ribbon 
Ice Blue Cardstock
Cricut Cartridge Flower Shop


Materials..

Sweet Tooth Papers
Love Bubbles Stamp
Ice Blue Card Cardstock
                            Materials used..
                          
                            Sweet Tooth Papers
                            Loopy Lops Strawberry Fair Stamp
                            Kiwi Ribbon
                            Deep Edger Flower Burst Punch

Friday, 11 November 2011

Next Weeks Shows

Hello All
  Just wanted to give you an update on my shows next week.  On Wednesday at 9am,5pm and 7pm I will be demonstrating the new Cricut Expression 2 at a fab price!!!!!! Then at 10am I will be doing Bo Bunny Christmas and HOTP. At 3pm on Ideal World I will be showing EK Success puches and tools..... I suspect that will be a fast and furious show as it usually sells out very quickly!
Then on Thursday I will be on at 8am with Cricut and Jones Tones fabric paint, and finally at 9am and 12pm with Stampavie. Both of these shows will have different product on them.
I am busily getting ready for these shows this weekend and I hope you can manage to watch next week.

Have a great weekend
Take care

Melanie xxx

Wednesday, 9 November 2011

What a week!!!!

Hello Crafters

  Wow, what a week it was last week. First of all the Cuttlebug four day deal sold out in 1 hour!!!! Then the next deal sold out on Wednesday and then we had an amazing Cricut Cartridge show on Thursday and straight to the NEC.
 I was in the cake hall working on the Cricut Cake stand. I can't tell you how much I enjoyed myself. It was great fun and extremely busy.  back to normal this week. I am prepping for my shows next week... Cricut on Tuesday and then EK Success, Jones Tones, Stampavie and Hot off the Press. Such a fabulous variety of product so make sure you tune in.
Don't forget, if you would like to see any short demos on any of our product or techniques then please feel free to ask. I will do my best to oblige.
Hope you are all having a great crafty week.

Take care
Melanie xxx